
The BIND DNS Server module
BIND (Berkeley Internet Name Domain) is the most common DNS server for Unix systems. Several versions have been released over the years, the most recent being version 9. The BIND DNS Server module (found under the Servers category) supports the configuration of versions 8 and 9. The older version 4 has a different configuration file format, and can be configured using the BIND 4 DNS Server module, documented in a later section of this chapter.
Because BIND is available for almost all Unix systems and works identically regardless of operating system, the instructions in this chapter apply not just to Linux but to other versions of Unix as well. Most versions of Unix and Linux include BIND 8 or 9 as a standard package, so it is rarely necessary to install it. If the module cannot find the DNS server, an error message will be displayed on the main page – if this happens, check your operating system CD or website for a BIND package, or download and compile the source from http://www.isc.org/.
BIND’s primary configuration file is /etc/named.conf, which contains all of the zones that the server hosts, and global configuration settings that apply to all zones. The records in each zone are stored in separate files, usually found in the /var/named directory. This Webmin module always updates all of these files directly, instead of by communicating with the running BIND process. This means that if you are running some other program that dynamically updates zones by communicating with BIND (such as a DHCP server), then this module should not be used as it may interfere with these changes. However, very few systems have this kind of dynamic updating activated.
Versions 9 of BIND has some features that version 8 does not. The most important one that is supported by this Webmin module is views. A view is a set of zones that are visible to only some DNS clients. Normally all clients see the same zones, but with BIND 9 you can restrict the visibility of some domains to only particular clients, identified by their IP addresses. This can be useful for creating zones that are only visible to systems on an internal network, even if your DNS server is connected to the Internet.
If you have never set up BIND on your system, when you enter the module for the first time the main page will display a form for setting up the DNS server, as shown below. This form is only shown if Webmin detects that the configuration file named.conf does not exist, or if the zone files directory that is specifies is non-existent. If you are certain that your BIND configuration is valid and that the DNS server is already running, do not click the Create button, as your named.conf file will be overwritten. Instead, click on the Module Config link and check that all the paths are correct for your system.
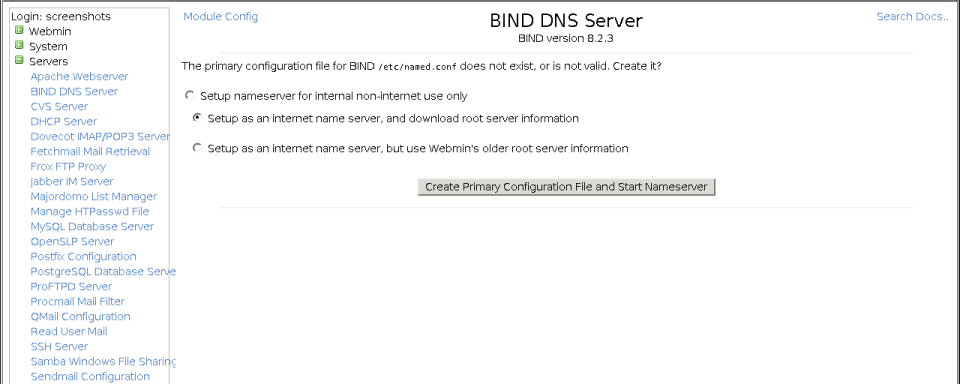
The BIND setup form

|
"An excellent book!" — Paul Wilmott Want to break into the lucrative world of trading and quantitative finance? You need this book! |
If you are setting up BIND for the first time, the setup form gives you three choices :
- Setup nameserver for internal non-internet use only
If you choose this option, your DNS server will be set up so that it can only resolve records in zones that it hosts. This is only useful on a private network that has no Internet connection at all.
- Setup as an internet name server, and download root server information
This is the most useful option – it sets your DNS server up to be able to host zones and to lookup records on the Internet. In order to query other Internet domains, a list of the root zone servers is needed, as explained in the introduction. When this option is selected, Webmin will FTP to rs.internic.net and download a file listing the server names and IP addresses for inclusion in the BIND configuration.
- Setup as an internet name server, but use Webmin’s older root server information
This option is identical to the previous one, but does not download the root zone file. Instead, it uses a copy of the file that comes with Webmin which may not be as up to date. However, if for some reason your system cannot connect to the rs.internic.net FTP server, this is your best choice.
Depending on which option you choose, a basic named.conf file will be created the root zone added to it. The module’s main page will then be re-displayed, so that you can add more zones or configure the server further.
When BIND has been set up on your system, the main page will appear as shown in the screenshot below. At the top is a table of icons for setting global options that apply to your entire DNS server. Below them are icons for each of the zones your server hosts, followed by icons for views if you are running BIND version 9. At the very bottom are buttons for applying the current DNS configuration or starting the BIND server.
If you have just set up BIND for the first time, there will probably be only one zone icon – the root zone. Some Linux distributions that include a BIND package come with a basic configuration file that defines zones like localdomain and 127.0.0, which are used for resolving the localhost and 127.0.0.l loopback hostname and IP address.
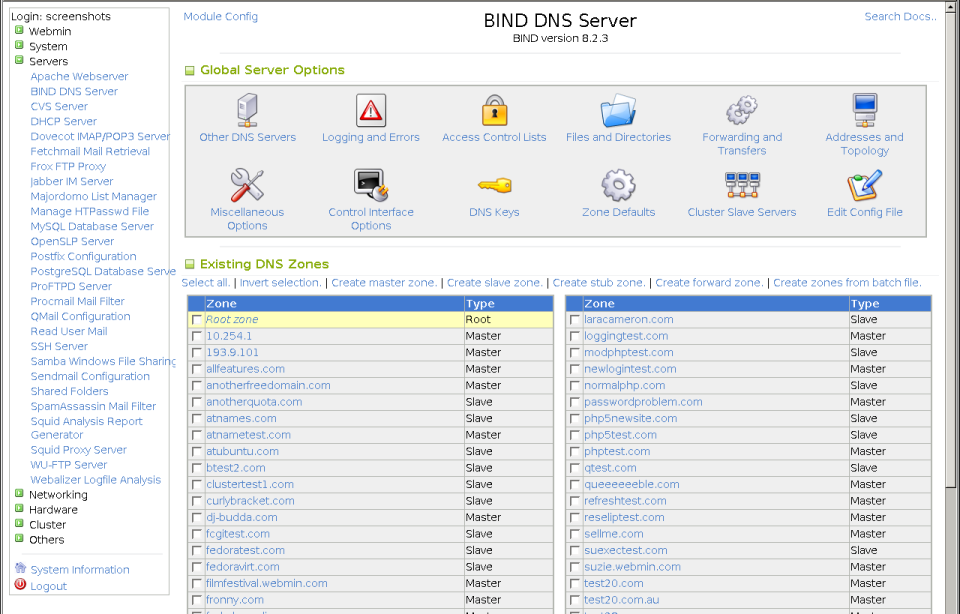
The BIND DNS Server module main page

a WordPress rating system


")
Related posts:
- Error reloading bind on server rndc: subdomain creation error
- Setting up DNS using Webmin (Quick Guide)
- Installing DirectAdmin in dedicated server
- How to install Webmin on CentOS, RHEL, Fedora, Mandriva, SuSE
- How to point a sub-domain to a different IP Address or Server?


")


