Archive for » 2009 «

Rebuilding cPanel’s Icon Sprites

You may need to rebuild cpanel’s icon sprites to refresh the icon cache specially when you have modified the icon and/or the any plugin icon does not show up in the interface.

This can be accomplished through the following command:

/usr/local/cpanel/bin/rebuild_sprites

Installing PostgreSQL on cPanel Server

Installing PostgreSQL is not a difficult process, but you should follow the steps below in order to ensure that everything is properly configured.

Note: cPanel requires PostgreSQL 7.3.x or later. Earlier versions will not work.


  1. If necessary, update to cPanel to latest version. You can update cPanel by typing /scripts/upcp from the command line while logged in as root.
  2. SSH to your server as root.
  3. If you have PostgreSQL 7.2.x installed, back up your databases using pg_dumpall or some other method. If you do not have databases you wish to keep, move your existing PostgreSQL data directory somewhere else by, for example, typing the following command:
    • mv /var/lib/pgsql /var/lib/pgsql.old
  4. Type the following command:
    • /scripts/installpostgres
  5. From your web browser, log into WebHost Manager.
  6. Select Postgres Config in the SQL Services section of WHM.
  7. Type a new PostgreSQL password in the text box and click Change Password.
    • Warning: Do not use non-alpha numeric characters, as these cause problems.
  8. If you are installing PostgreSQL for the first time, click the Install Config button.
    • Warning: If you have an existing PostgreSQL configuration, this will overwrite your configuration authentication file ( pg_hba.conf).
  9. If you are upgrading from PostgreSQL 7.2.x or earlier, restore the SQL dump you created in step 3 by using psql or some other method.
  10. PostgreSQL is now accessible from your cPanel interface.

Website publishing in Plesk control panel

Here’s a brief documentation on creating & publishing sites using different methods. Once you add a Domain in Plesk control panel, you can create your site content (Web pages, scripts & graphic files that compose your site) on your home or office computer & then publish it to the web server in any of the following ways:

* Through FTP connection (most common & easiest way),
* Through Plesk File Manager,
* Through Adobe Dreamweaver or Microsoft FrontPage software.

Let’s go through each of the following processes one-by-one. more…

Default (catchall) email address setup in cPanel

Using the default email address feature, you can catch all un-routed emails. That means, when an email is received in your domain but there is no such recipient, the emails will be bounced. However, you can receive all such mails using default email address.


To setup:

1. Login to your control panel (http://yourdomain.com:2082)

2. Click Default Address from Mail section.

3. Select the domain from the drop down list.

catchup

4. Choose Forward to email address and enter a valid email address and click Change.

5. From now all un-routed emails will go to the given address.

Note that, the default address should be set to an address you have actually created to make that address the catchall address or “:fail: no such address here” to bounce messages to accounts you have not created or “:blackhole:” to delete messages to accounts you have not created (without the quotes).


The problem of enabling “Catch All”:
Problems can sometimes arise when Spammers or junk mailers use this feature as a means to pump their trash into your mailbox. As long as the “catch all” is enabled, then all they must do is send to [email protected] and it will reach you.

The downside of enabling “Catch All”:


Problems can sometimes arise when Spammers or junk mailers use this feature as a means to pump their trash into your mailbox. As long as the “catch all” is enabled, then all they must do is send to [email protected] and it will reach you.

On the other hand, if you’re using “specific pop email accounts”, you could opt to disable the “catch all”, which would mean that “only visitors or associates who you’ve given a specific address to” can send mail to a particular email account on your domain.

In this case, everything else, (that you have not configured as a pop mail account) is bounced back to the sender. In our opinion, we suggest leaving your “catch all” enabled for the time being. If Spammers begin sending random junk messages using [email protected], then you can disable your “catch all” feature.

Category: cPanel  Tags: , , , ,  One Comment

Linux Hosting Control Panels

A Control Panel is a very important factor that comes with web hosting service. Your control panel determines how accessible the features of the server are to you so as to maximize the benefits to your web site. Since a large number of hosts offer hosting on Linux platform, following is a run down of the types of Linux control panels that are common in the market. cPanel, Plesk and Ensim are the three major linux control panels.

The first and most popular control panel is cPanel. It offers the most functionality and user friendliness as compared to other control panels. Some of it’s stand out features are the themes which make the control panel very accessible and user friendly. The current version of cPanel also offers quite a number of useful features e.g. a variety of web statistic programs. cPanel control panel also allows multiple file uploads and automatic installation of other 3rd party programs and scripts via its Fantastico section.

The second type of control panel is Ensim. This control panel has the advantage of being secure since the updates are very strictly controlled from the parent company as compared to the automatic updates of cPanel. Ensim Pro’s control panel offers four powerful roles, each with their own roles & responsibilities. Service Provider Administrator manages servers, resellers and sites, Reseller Administrator creates and manages sites on a portion of the server, Site Administrator manages users and site configuration and lastly End User Administrator manages email and supports site as permissions allow. Ensim Pro works for both Windows and Linux servers efficiently.

The third type of control panel is Plesk. This control panel has a very beautiful interface. It has a favorites interface for the most recent tasks. Like cPanel, it also has an Updater to aid in maintaining and updating the control panel software. It also allows easy installation of 3rd party software. In terms of features, it easily competes with cPanel. Like Ensim, it also has four user levels: Administrator, Client, Domain Owner and Mail User.

Another one is webmin which is free. It can configure many operating system internals, such as users, disk quotas, services, configuration files etc., as well as modify and control many open source apps, such as the Apache HTTP Server, PHP, MySQL etc. Webmin is largely based on Perl, running as its own process and web server. It defaults to TCP port 10000 for communicating, and can be configured to use SSL if OpenSSL is installed with additional required Perl Modules. It is built around modules, which have an interface to the configuration files and the Webmin server. This makes it easy to add new functionality without much work. Due to Webmin’s modular design, it would be possible for anyone who is interested to write plugins for desktop configuration. Webmin also allows for controlling many machines through a single interface, or seamless login on other webmin hosts on the same subnet or LAN.

All the control panels have strengths and weaknesses, and the primary factors in deciding which ones to go for would be price difference and their availability on the web host servers.

Install SSL certificate on Windows Server 2000 / 2003

  • Open Internet Services Manager from the Administrative Tools.
  • Right click on the website where you previously created a CSR and choose “Properties”.
  • Press the “Directory Security” tab and then click “Server Certificate” in the “Secure Communications” section.
  • When the wizard starts, choose “Process the pending request…” and press “Next”.
  • In the next screen, click “Browse” and then click the drop down box to choose “All Files *.*”. Now, navigate to the folder where you stored the .p7b file and select it.
  • Press “OK” and then click next.
  • Verify that the port number is correct (you won’t see this when renewing a certificate). The default SSL port is 443.
  • Finish the wizard and your certificate and intermediates will be installed.

Installing the intermediate certificates

If you completed the steps above using the .p7b, your certificate is completely installed along with the intermediates. So you don’t need to follow these steps. However, if you used the .cer file instead, you will need to perform the following steps:

  • Download intermediate from your CA site
  • Move the file onto the Windows Server
  • Double-click the xroot.crt certificate and click “Install Certificate”.
  • Click “Next”, and then choose “Place all certificates in the following store”.
  • Click “Browse”, and then “Show Physical Stores”.
  • Click the plus (+) sign next to “Trusted Root Certification Authorities” and click “Local Computer” underneath it.
  • Click “OK”, then “Next” and then “Finish”.

Completing the installation

Your new certificates are available instantly – there is no need to restart IIS or the server itself. However, if you have a Microsoft ISA 2000/2004 server in front of your IIS server, you will need to follow the installation instructions for the Microsoft ISA Server as well.

Install an SSL certificate in WHM

Once you have generated or received an SSL certificate, you can install the certificate using WebHost Manager. You need both the certificate and key files to install the certificate.

To install an SSL certificate:

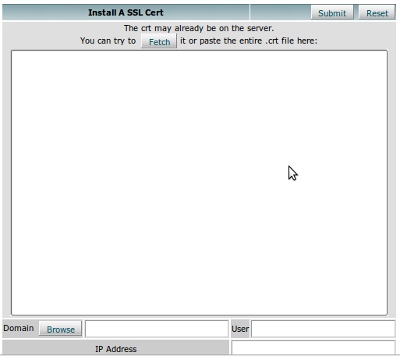
  1. Click on the Install an SSL Certificate and Setup the Domain link in the SSL/TLS menu.

  2. Paste the certificate in the box. It will automatically detect relevant information.
    sslinstall

  3. In some cases, you may need ca bundle. If you have or required that, paste the ca bundle for the certificate in the bottom display area, if required.

  4. Click on the submit button.


Category: cPanel  Leave a Comment

Generate a SSL Certificate and Signing Request

To install SSL for any domain, it must have dedicated IP address. So, if you don’t have a dedicated IP address for that same, you must assign it.

To generate a SSL certificate signing request, follow the steps below:

- Login to your WHM

- Make sure the domain has dedicated IP address.

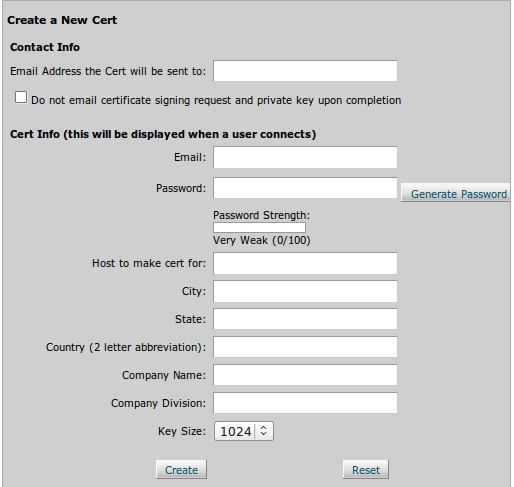
- Click Generate a SSL Certificate and Signing Request from SSL/TSL section

- Fill up the form with accurate information. Use strong password. You may auto generate it clicking Generate Password button.

sslcsr

- Click the Create button.

- Your certification and signing request will be created. The certificate signing request will be needed when you want it to be signed by a Certificate Authority (CA).

How to allow remote SQL connection to your site

Sometimes you may need to allow access of remote servers to your site’s mysql server. As mysql considers host for authentication anyone can’t connect from remote server unless allowed explicitly.

You can grant remote MySQL in the following steps:

- Login to cPanel

- Click Remote MySQL from Databases section

remote_mysql

- Enter your connecting host IP in the box and click Add Host. You may use wild card (%) too. For example, you you write 192.168.0.%, it will allow any ip from 192.168.0.1 to 192.168.0.255.

remote_mysql1


Category: cPanel  Tags: ,  Leave a Comment

Lxadmin (Kloxo) control panel

Kloxo (formerly known as Lxadmin) is a proprietary web hosting control panel. It comes in two flavors: Kloxo Host-in-a-box is a light weight solution which uses lighttpd and djbdns. Kloxo Enterprise is a multi-server hosting platform capable of managing a high number of domains and servers.

Kloxo allows the host administrators to run either lighttpd/Apache or djbdns/bind and also provides graphical interface to switch between these programs without losing any data. Additionally, Kloxo Enterprise can transparently move web/mail/dns from one server running Apache to another running lighttpd.

Kloxo comes integrated with Installapp which is a bundle of approximately 130 web applications that can be installed to the hosted websites. It also supports Installatron (a third party application installer similar to Fantastico) as a plugin.

In June 2009 K T Ligesh, the sole owner and developer of Lxlabs, was found to have committed suicide in his house. Reports of his death incorrectly linked his reasons to a potential bug in the LXLabs software that allowed an attacker to gain access, and destroy a large number of VPS accounts from VAServ. The exact way of entrance has yet to be released to the public.

It was announced on July 10, 2009 that Kloxo and HyperVM would be continued in a consortium to be formed by Arthur Thornton, Danny Terweij, and S Bhargava.

Common Features

  1. CentOS 5 Support
  2. View the entire hosting and every domain from a single page.
  3. Redundant Master. Ability to have a mirror of the primary master, eliminating single point of failure.
  4. Lxguard, advanced intrusion detection management interface.
  5. Supports Apache/lighttpd, djbdns/bind and pure-ftpd
  6. On-the-fly switch between applications
  7. Daily updates
  8. Scale to million hits per day, using fastcgi
  9. Advanced Backup/Restore
  10. Upgrade from HostInABox to Enterprise without re-installing
  11. Parked/Redirected Domains
  12. Integrated RoR
  13. InstallApp

More info: http://lxlabs.com/

Source: http://en.wikipedia.org/wiki/Lxadmin